CyAnimator: Simple Animation of Cytoscape Networks

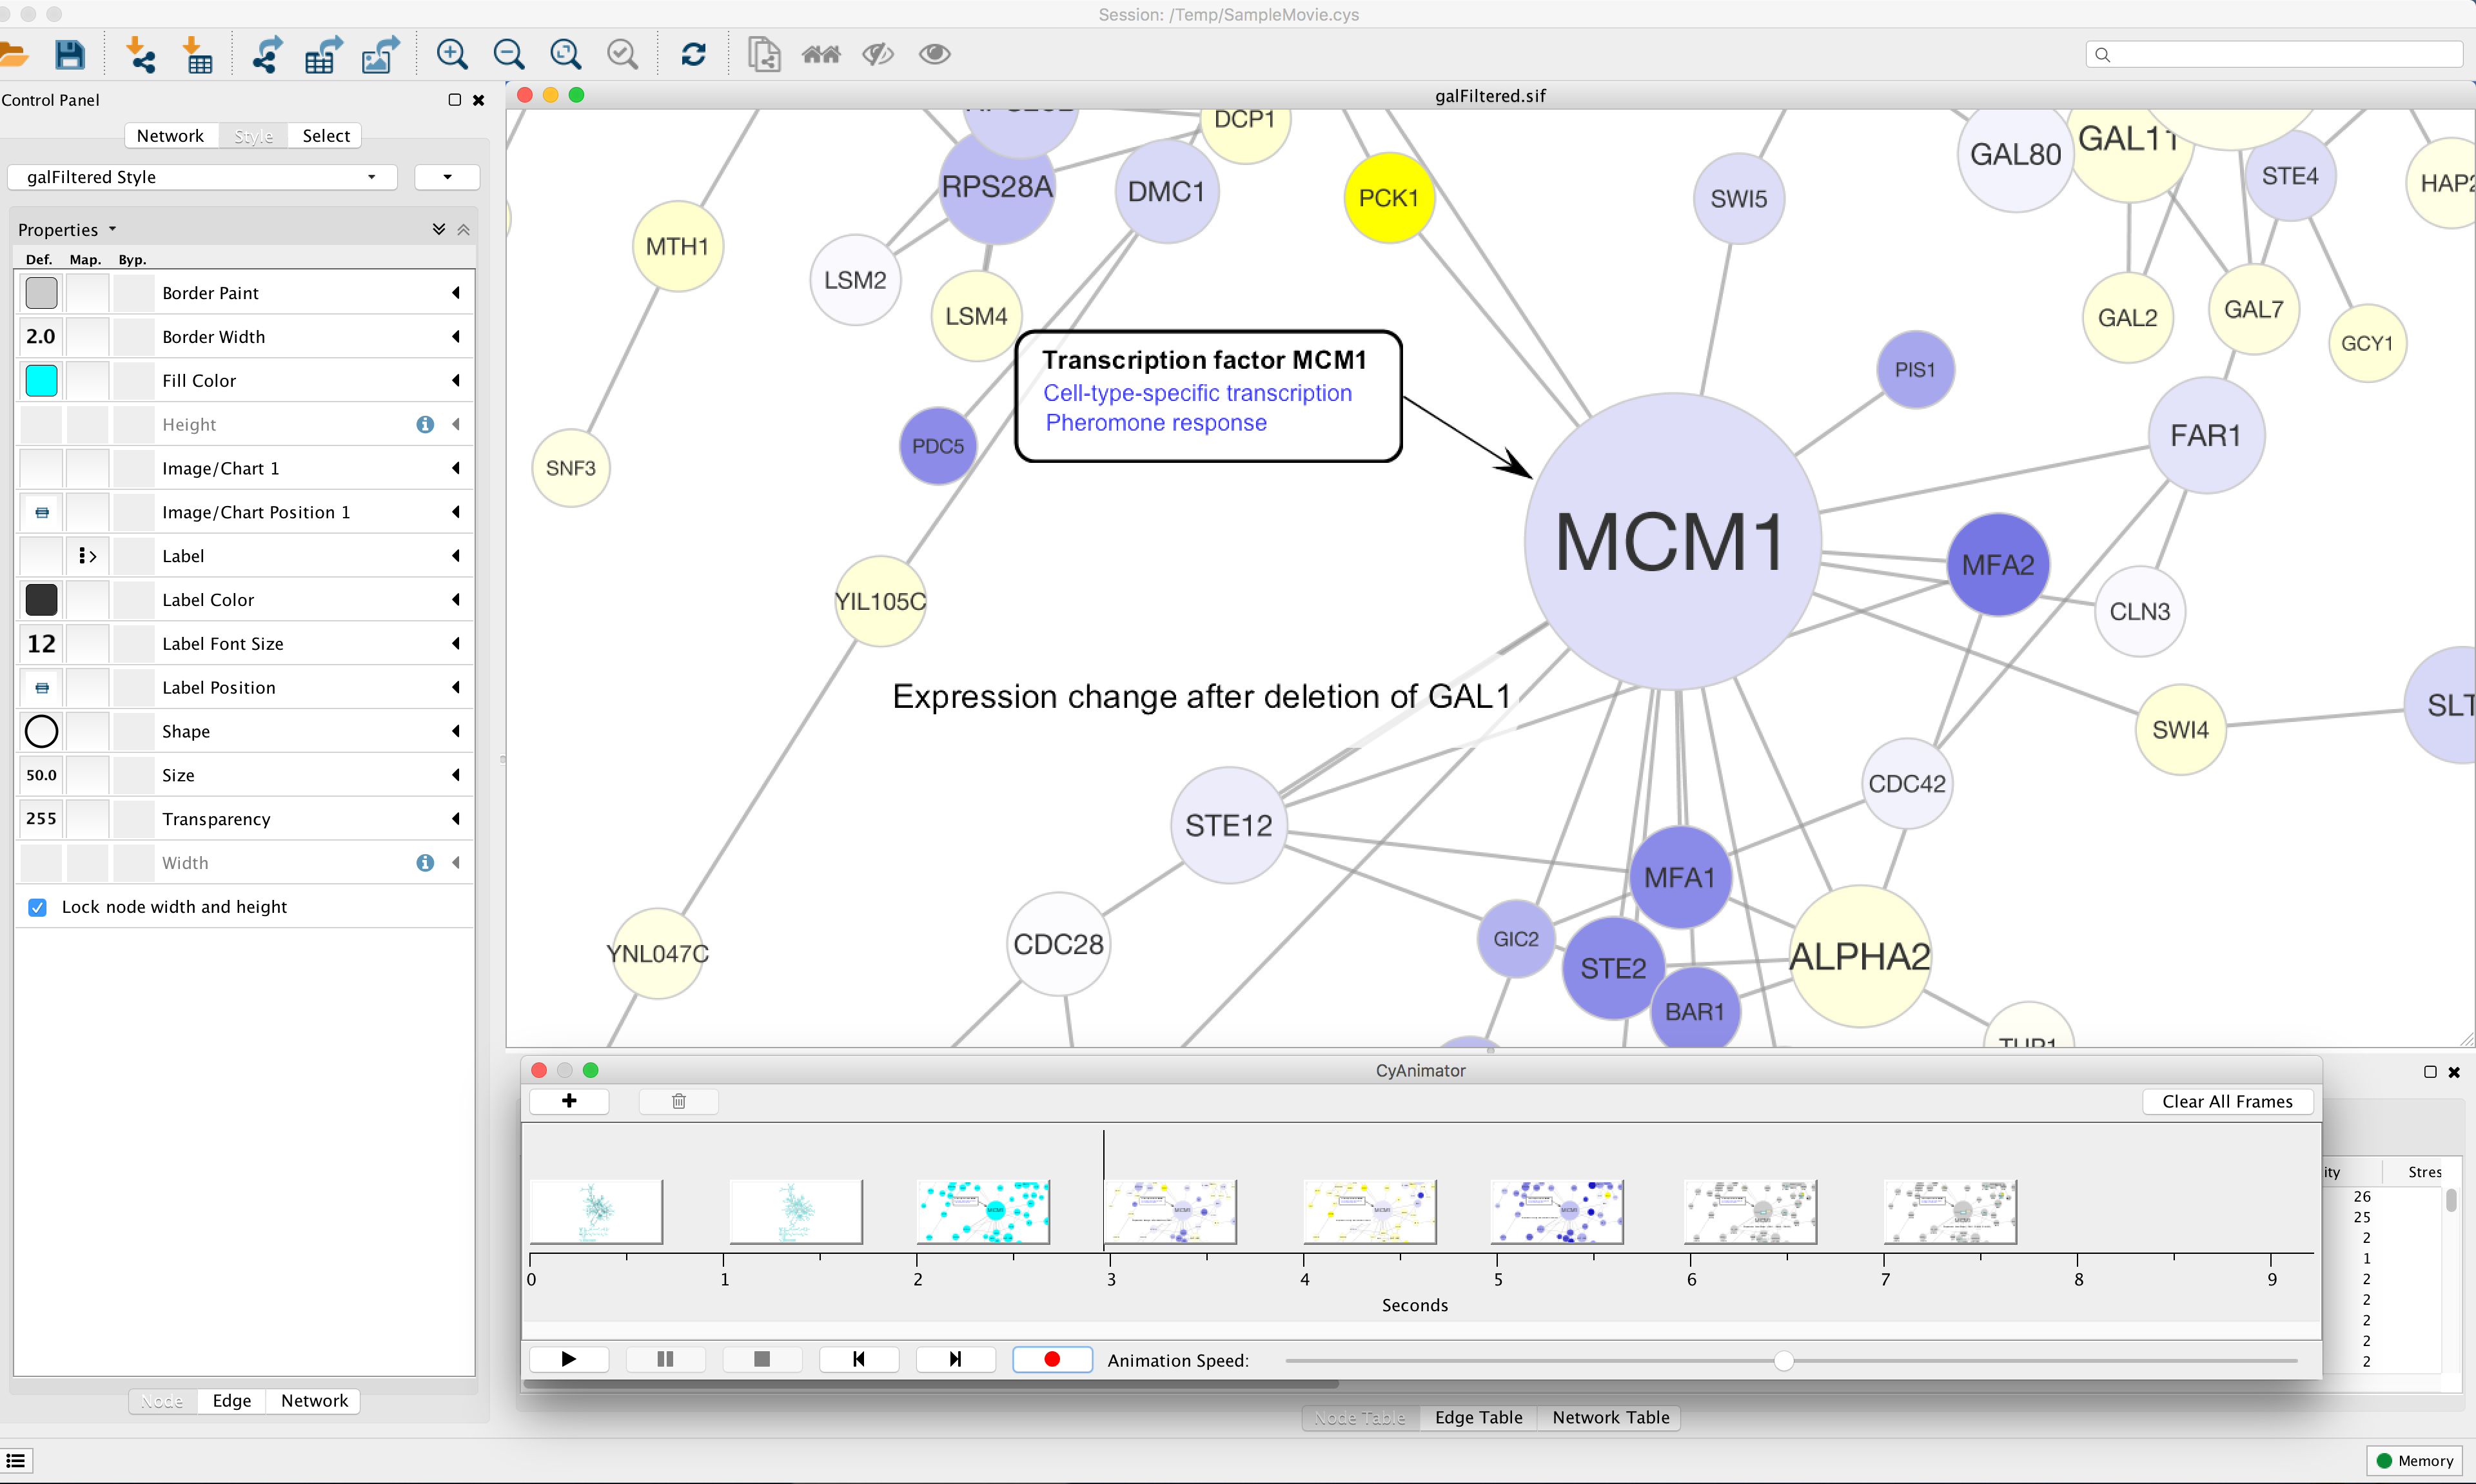
Figure 1. This example shows CyAnimator with eight frames captured. Using the buttons on the tool users can animate between frames or create a movie. Dragging the frame thumbnails allows users to adjust the number of intermediate frames between each thumbnail. The timeline assumes 30 frames per second.
CyAnimator is a Cytoscape app that provides a tool for simple animations of Cytoscape networks. The tool allows you to take a series of snapshots (CyAnimator calls them frames) of Cytoscape networks. For example, the first frame might be of a network zoomed out and the second frame might focus on a specific group of nodes (see Figure 1). Once these two frames are captured by the tool, it can animate between them by interpolating the changes in location, zoom, node color, node size, edge thickness, presence or absence of annotations, etc. Some changes (custom graphics, node charts, etc.) are interpolated by cross-fading between the two states and others (e.g. node shape) are interpolated by fading out one state and fading in the other. CyAnimator depends on version 3.3 of Cytoscape and is available from the Cytoscape app manager or apps web site.
Installation
CyAnimator is available through the Cytoscape App store or the App Manager. To download CyAnimator using the app manager, you must be running Cytoscape 3.3 or newer. To install CyAnimator start Cytoscape 3.3 or better and either navigate directly to the Cytoscape App Store using a web browser, or bring up the App Manager (Apps→App Manager). CyAnimator is tagged with the animation tag, or you can just search for CyAnimator. In either approach, select the app and press Install.
The CyAnimator source is available on github at https://github.com/RBVI/CyAnimator.
Normal Workflow
To bring up CyAnimator select
Apps→CyAnimator. This will bring up an empty CyAnimator dialog. Note that
CyAnimator is only able to animate between networks in the same network collection. Starting CyAnimator
on a new network collection will a new, empty, CyAnimator dialog. Once a CyAnimator dialog is open, the
general workflow would be to manipulate the network to what you want it to look like at the start of
your movie, then press the ![]() button to add the frame to CyAnimator. Once the frame has
been added, you can modify your network to what you want it to look like in the next frame of your
movie and then again press the
button to add the frame to CyAnimator. Once the frame has
been added, you can modify your network to what you want it to look like in the next frame of your
movie and then again press the ![]() button. Note that CyAnimator will do all of the
interpolation to get from one frame to another, so the manipulations of the network can include a variety
of changes, including changes in color, position, zoom, annotations, etc. Repeat this process until you
are happy with your movie, then simple press the record (
button. Note that CyAnimator will do all of the
interpolation to get from one frame to another, so the manipulations of the network can include a variety
of changes, including changes in color, position, zoom, annotations, etc. Repeat this process until you
are happy with your movie, then simple press the record (![]() ) button. If you want more
time between any two frames, you can simply drag the frame within the timeline. Holding down the shift key while
dragging a frame will also drag all of the frames to the right of that frame on the timeline. This allows you to
shift an entire group of frames over, if desired.
To show a particular frame
in Cytoscape, double-click on that frame. A single-click will select the frame. The
) button. If you want more
time between any two frames, you can simply drag the frame within the timeline. Holding down the shift key while
dragging a frame will also drag all of the frames to the right of that frame on the timeline. This allows you to
shift an entire group of frames over, if desired.
To show a particular frame
in Cytoscape, double-click on that frame. A single-click will select the frame. The
![]() button will delete all selected frames from the
timeline. To remove all frames, click on the Clear All Frames button in the upper-right
corner of the dialog. NOTE: There is no "undo" in CyAnimator, so once a frame is deleted you will need to recreate
it and add it to the timeline again.
button will delete all selected frames from the
timeline. To remove all frames, click on the Clear All Frames button in the upper-right
corner of the dialog. NOTE: There is no "undo" in CyAnimator, so once a frame is deleted you will need to recreate
it and add it to the timeline again.
CyAnimator saves frame information as part of the session, so saving a session will also save the current state of the timeline and all frames added to the timeline. Due to a bug in the Cytoscape, you will need to load the session after starting Cytoscape (double-clicking on the session file won't properly load the timeline).

Figure 2. The CyAnimator Dialog. This dialog shows all of the captured frames for this network collection, and provides the controls for the animation and movie creation.
CyAnimator Dialog
The CyAnimator dialog provides the main interface to CyAnimator, including the following controls:
| Add the current network view as a frame to the animation | |
| Remove all selected frames from the animation | |
| Play the animation by interpolating through each frame | |
| Pause the currently playing animation | |
| Stop the currently playing animation | |
| Step backwards to the previous interpolated frame | |
| Step forwards to the next interpolated frame | |
| If set, causes animation to loop until stopped | |
| Bring up the Output Options dialog and record a movie or (optionally) save each of the interpolated frames. | |
| Speed slider | The speed slider controls the speed of the animation (but is ignored for the recorded movies, which uses it's own Frame rate option. |
Record Dialog

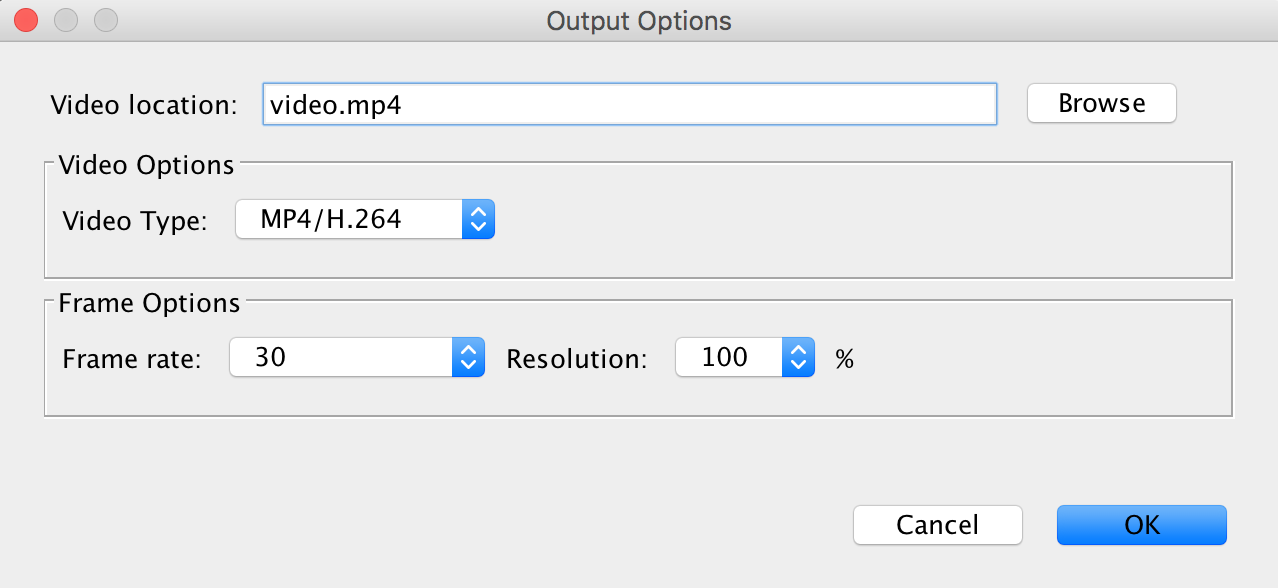
Figure 3. The Output Options Dialog showing the production of an H.264 video file at the screen resolution and 30 frames/second.
Video Types
- Frames
- This is the simplest of the video types. This will output each frame as a ".png" file at the requested resolution (see below) into the Video location directory specified. To make a movie, you could use any of the standard video packages that accept individual frames (e.g. iMovie on the Macintosh). Note that the Frames Per Second option doesn't make sense for this output type, and will be disabled.
- Animated GIF
- This will output an animated GIF of the interpolated frames. Animated GIF files are easy to show on web sites, but are not the currently accepted standard format. On the other hand, animated GIF files are computationally very easy to produce.
- MP4/H.264
- This will output an MPEG4 file of the interpolated frames encoded with H.264.
- Frames rate
- This controls the speed of the movie in terms of the number of frames per second. Four frame rates are offered, the two standard frame rates: 25 (PAL) and 29.97 (NTSC), and 30 and 60. The timeline dialog is calibrated at 30 frames per second, so a frame rate of 30 will correspond to the timeline and is a good default unless there is a reason to use one of the standards.
- Resolution
- This controls the resolution of the output frames. The units are % expansion, so a Resolution of 300 would result in a 300% (or 3X) expansion of the output image. This is extremely important for high-quality videos. We recommend at least a 2X (Resolution of 200) expansion for any published video.
- The full network using the default style
- A view focused on MCM1 (YMR043W)
- The same view using COMMON NAME for the node label and circle for node shape
- The same view as #3, but scaled the node size and node label size by Degree
- In this view, I added in some annotations to highlight MCM1
- Changed the node colors using the data from the gal1RGexp column. Color gradient is from blue to yellow. Added a text annotation describing the data
- The same view as the above – to hold it on the screen
- The same as #6, but using gal4RGexp as the column for the node color gradient
- Again, use the same frame before to provide some time onscreen
- The same as #8, but using gal80Gexp as the column
- Another frame of gal80Gexp
- This frame uses the custom graphics Chart feature to show all three expression values and shows how custom graphics fade in. The labels were also moved down to avoid the charts
- The final frame is another capture frame of the same frame as #12
Frame Options
Sample Movie
A Sample Movie created with CyAnimator is available for viewing. This used 13 key frames:Last updated on November 10, 2015
About RBVI | Projects | People | Publications | Resources | Visit Us
Copyright 2021 Regents of the University of California. All rights reserved.


